
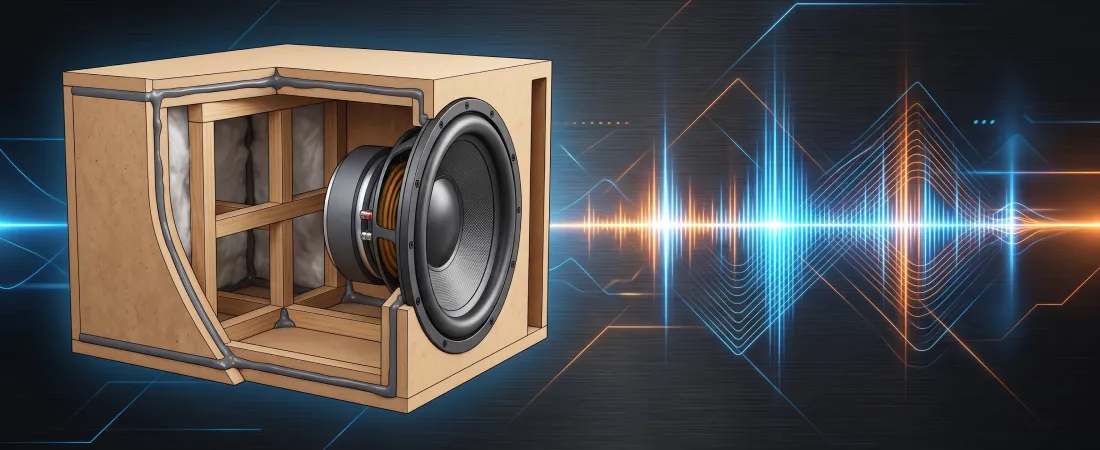
Constructing a subwoofer enclosure requires more than just cutting wood to match a calculated internal volume. Even if your net volume (Vb) matches software specifications perfectly, a box that flexes or leaks air will fail to deliver tight, accurate low-frequency output.
Understanding how panel flex and air leaks degrade acoustic performance allows you to build rigid, airtight enclosures that maximize sound pressure level (SPL), preserve transient response, and protect your drivers.
Why Cabinet Rigidity Matters: The Physics of Panel Flex
When a subwoofer cone moves back and forth, it generates high internal air pressure changes inside the cabinet. If the walls of the enclosure are unbraced or constructed from thin, flexible panel material, those walls bow outward under pressure and contract inward under vacuum.
Panel flexing creates several severe acoustic problems:
- Acoustic Energy Loss: Energy spent flexing heavy wood panels is energy stolen from moving air through the cone or port. This directly reduces total decibel output and bass impact.
- Harmonic Coloration: Flexing panels act like large, uncontrolled passive radiators, vibrating at their own mechanical resonance frequencies. This introduces boomy, distorted frequencies that obscure clean bass notes.
- Shifted Enclosure Volume: As panels balloon outward under load, the effective internal volume (Vb) momentarily expands. In sealed enclosures, this alters the system total quality factor (Qtc), turning tight, articulate bass into muddy, sluggish sound.
For optimal rigidity, 3/4-inch (19 mm) Medium-Density Fiberboard (MDF) or Baltic Birch plywood should be used for standard installations, while double-layered front baffles (1.5 inches) are recommended for high-power subwoofers.
Internal Bracing Techniques
Adding internal bracing connects opposing cabinet walls, dramatically shortening the unsupported span of each panel and shifting panel resonance far above the audio passband.
1. Window Bracing (Matrix Bracing)
Window braces are internal wooden frames cut from 3/4-inch material with large center cutouts. Placed horizontally or vertically between opposite walls, window braces provide structural rigidity across all four side panels while allowing air to move freely inside the cabinet.
2. Cross-Dowel / Cross-Bracing
Wooden dowels or 2×2-inch struts connect the centers of opposing large panels (e.g., front-to-back or side-to-side). Because the center of a panel flexes the most under pressure, bracing these midpoints stops structural movement with minimal internal volume displacement.
3. Corner Cleats & Joint Reinforcement
Attaching triangular corner blocks or 1×1-inch wooden strips along internal 90-degree seams strengthens panel joints and increases the surface area for glue bonding.
Crucial Note: Bracing occupies physical space inside the enclosure. Always subtract the volume of all internal braces from your gross box volume to ensure your net internal volume (Vb) remains accurate.
Learn how internal air space shapes frequency response curves in our guide on how box size affects your sound.
The Danger of Air Leaks in Sealed and Ported Boxes
Air leaks occur whenever high-pressure air escapes through unsealed panel seams, screw holes, terminal cups, or driver mounting flanges.
- In Sealed Enclosures: A sealed box relies on trapped air acting as an acoustic spring to cushion cone movement. Air leaks destroy this pneumatic spring compliance, lowering system Qtc, reducing mechanical power handling, and causing the subwoofer to bottom out under heavy power.
- In Ported Enclosures: A ported box is engineered to exchange air strictly through its tuned duct. Unintended air leaks alter the calculated port tuning frequency (Fb), create high-velocity whistling noise (chuffing), and reduce port output efficiency.
To compare performance traits across enclosure styles, read our guide on sealed vs ported enclosures.
Step-by-Step Sealing Best Practices
Eliminating air leaks requires careful preparation during joint assembly:
- Apply Continuous Wood Glue: Run a thick, continuous bead of PVA wood glue (e.g., Titebond) across 100% of mating panel edges before clamping. Screws or brad nails hold panels tight while glue cures, but glue provides the actual structural bond and airtight seal.
- Seal Internal Seams: Once the cabinet shell is assembled, run a bead of silicone caulk or wood glue along all interior joints, smoothing it with a gloved finger to seal microscopic gaps.
- Use Subwoofer Gaskets: Always install a foam or rubber mounting gasket between the metal subwoofer frame and the front baffle to prevent air from escaping around driver screw holes.
- Avoid Plastic Terminal Cups: Cheap plastic terminal cups flex under pressure and frequently leak around wire contacts. Use heavy-duty brass binding posts or sealed wire grommets instead.
Recommended Video Resources
How to Build a Custom Slot Ported Subwoofer Enclosure
This video demonstrates proper wood gluing, internal seam sealing, and slot port bracing techniques during a custom enclosure build.
Subwoofer Box Bracing Explained
A practical breakdown of window bracing, dowel placement, and how to reinforce cabinet walls without stealing excessive internal volume.
Common Mistakes
- Relying on Screws Instead of Glue: Fasteners draw panels together, but only a continuous glue joint creates a strong, airtight seal.
- Using Cheap Plastic Terminal Cups: Thin terminal cups crack under high internal pressure and serve as a major source of air leaks.
- Ignoring Internal Brace Displacement: Failing to account for the physical volume of braces shifts the final box tuning frequency (Fb) or system Qtc higher than intended.
- Mounting Subwoofers Without Gaskets: Screwing a metal driver flange directly onto bare wood leaves small gaps where air escapes during high excursion.
- Using Thin or Low-Density Wood: Particleboard and thin 1/2-inch plywood flex easily and ring at audible resonance frequencies.
References
- Sonic Electronix Learning Center – What is Polyfill & How Does It Affect Enclosure Volume?
- Crutchfield Learning Center – How to Build a Subwoofer Box: Bracing & Sealing Guide
- JL Audio Technical Library – Enclosure Specifications & Wall Thickness Requirements